--------- MCMDE Assignment One Begins-----------
Pre-Drive In-Car Instruction: Lesson 1
Student Goals
| Distracted Driving Awareness | Pre-Driving Tasks | Starting Procedure | Hydroplaning | Tire Tread Depth, Rotating, & Pressure |
| Vehicle Fluid Maintenance | Vehicle Batteries | Radiator Importance | Oil Level | Correct Seat Positioning |
| Head Rest Positiions | Seat Belt Positioning | Blind Spots | Adjusting Mirrors | Vehicle Starting Tasks |
| Using Vehicle Lights | Vehicle Dashboard | Turning the Steering Wheel |
Pre-Driving Tasks
It’s important to perform the following tasks prior to entering the car:
You should also perform the following adjustments after entering the car (but prior to starting the car):
Starting Procedure
Hydroplaning
Hydroplaning Basics: Why it
Occurs and How You Can Avoid it
Have you ever skidded while
driving on a wet road for what seemed like a split second or even longer? Even
if you didn’t lose complete control, you most likely experienced hydroplaning.
What is Hydroplaning?
The term hydroplaning is
commonly used to refer to the skidding or sliding of a cars tires across a wet
surface. Hydroplaning occurs when a tire encounters more water than it can
scatter. Water pressure in the front of the wheel pushes water under the tire,
and the tire is then separated from the road surface by a thin film of water and
loses traction. The result is loss of steering, braking and power control.
Rubber tires have tread
(grooves) that are designed to channel water from beneath the tire. This creates
higher friction with the road surface and can help prevent or minimize instances
of hydroplaning.
When does Hydroplaning Occur?
Hydroplaning can occur on
any wet road surface, however, the first 10 minutes of a light rain can be the
most dangerous.
When light rain mixes with
oil residue on the road surface, it creates slippery conditions that can cause
vehicles, especially those traveling speeds in excess of 35 mph, to hydroplane.
This can be a deadly combination for the driver and surrounding motorists.
The chance of being
involved in a motor vehicle accident increases during poor weather conditions
such as fog, rain, ice and snow. However, it isn’t necessarily the pounding rain
and blinding snow that are the most dangerous; it is the slick conditions that
drivers aren’t prepared for.
How do I Avoid Hydroplaning?
The following are important tips to avoid hydroplaning:
1.
Keep your tires properly
inflated
2.
Rotate and replace tires
when necessary
3.
Slow down when roads are
wet: the faster you drive, the harder it is for your tires to scatter the water
4.
Stay away from puddles and
standing water
5.
Avoid driving in outer
lanes where water tends to accumulate
6.
Try to drive in the tire
tracks left by the cars in front of you
7.
Turn off cruise control
8.
Drive in a lower gear
9.
Avoid hard braking
10.
Try not to make sharp or
quick turns
Tire Tread Depth
Once you have determined the approximate remaining tread depth in the first location, you can complete your measurement of each tire by placing the coin into additional locations at least 15 inches apart around the tire's central circumferential groove, as well as in its inner and outer grooves. This will help detect uneven wear caused by mechanical or service conditions.
According to most states' laws, tires are legally worn out when they have worn down to 2/32" of remaining tread depth. To help warn drivers that their tires have reached that point, tires sold in North America are required to have indicators molded into their tread design called "wear bars" which run across their tread pattern from their outside shoulder to inside shoulder. Wear bars are designed to visually connect the elements of the tire's tread pattern and warn drivers when their tires no longer meet minimum tread depth requirements.
However, as a tire wears it's important to realize that the tire's ability to perform in rain and snow will be reduced. With 2/32" of remaining tread depth, resistance to hydroplaning in the rain at highway speeds has been significantly reduced, and traction in snow has been virtually eliminated.
If rain and wet roads are a concern, you should consider replacing your tires when they reach approximately 4/32" of remaining tread depth. Since water can't be compressed, you need enough tread depth to allow rain to escape through the tire's grooves. If the water can't escape fast enough, your vehicle's tires will be forced to hydroplane (float) on top of the water, losing traction.
If snow-covered roads are a concern, you should consider replacing your tires when they reach approximately 5/32" of remaining tread depth to maintain good mobility. You need more tread depth in snow because your tires need to compress the snow in their grooves and release it as they roll. If there isn't sufficient tread depth, the "bites" of snow your tires can take on each revolution will be reduced to "nibbles," and your vehicle's traction and mobility will be sacrificed. Because tread depth is such an important element for snow traction, winter tires usually start with noticeably deeper tread depths than typical All-Season or summer tires. Some winter tires even have a second series of "wear bars" molded in their tread pattern indicating approximately 6/32" remaining tread depth to warn you when your tires no longer meet the desired tread depth.
Rotating Tires
Tire Rotation
Tire rotation is vital to achieving even tread wear and long tread life.
Rotation is necessary because of the uneven wear characteristics of each wheel
position on the vehicle. Rotate tires at the vehicle manufacturer's recommended
intervals or at 6,000 miles if not specified.
Checking Tire Pressure
Checking Tire Pressure Video One
What is this?
Tire pressure is a measure of the
amount of air in a vehicle's tires, in pounds per square inch. The required
service involves checking the tires' pressure with a pressure gauge, at least
monthly, if not more frequently.
Yes. Absolutely.
Having the proper tire pressure is a crucial
safety issue. Next to the brakes, the tires are the most important safety
devices on your car. Incorrect tire pressure will compromise cornering, braking
and stability. And in the worst-case scenario, improper tire pressure can lead
to tire failure — and a serious accident. Incorrect tire pressure also will
affect your comfort, fuel economy and tire life.
If tire pressure is too high, then less of the
tire touches the ground. As a consequence, your car will bounce around on the
road. And when your tires are bouncing instead of firmly planted on the road,
traction suffers and so do your stopping distances. You'll also feel a decrease
in ride comfort. (Hint: If you notice that every tie you own has coffee on it,
check your tire pressure. It may be too high.)
If tire pressure is too low, then too much of
the tire's surface area touches the ground, which increases friction between the
road and the tire. As a result, not only will your tires wear prematurely, but
they also could overheat. Overheating can lead to tread separation — and a nasty
accident. One sign of low tire pressure is if your tires squeal when cornering.
And you need to check your tire pressure even
if your tires aren't leaking.
Why? Because tire pressure also changes with the temperature outside. Tire
pressure decreases by about 1 pound per square inch for every 10-degree drop in
outside air temperature. So if you last had your tire pressure checked in July,
when it was 80 degrees outside, and it's now January — and the temperature is
minus 20 — your tires may be underinflated by 10 pounds, which is dangerous.
What You Should Do If You Hydroplane Video One
Jump Starting Your Vehicle's Battery
One temporary way around a dead battery is by using jump leads or a power pack. However, follow the instructions very carefully and check your vehicle handbook before going ahead.
Determine which terminals are positive and negative
on both batteries. Look for "+" sign or red indicator for positive, "-" sign or
black indicator for negative. The positive terminal is usually wider than the
negative.
Caution: Once you begin the next steps,
do not touch the metal portion of the jumper cable clamps to each other or any
part of the car except the proper battery terminal.
Jump Starting Your Vehicle's Battery Video One
Changing a Vehicle's Battery
1.
With the engine off, pop the hood and
find the battery. Detach the negative (black) battery cable from the battery.
First loosen the nut with a combination wrench. A better tool to use would be
battery pliers or a battery wrench.
2.
Twist and pull up on the end of the
cable with your hand. If it does not come off easily you may want to purchase a
battery terminal puller. This will help prevent damage to your battery or
cables. It is not recommended to use a screwdriver as a pry-bar; this could
break off your battery terminal or cause other damage.
3.
Detach the positive (red) battery
cable from the battery using the same method.
4.
Using a combination wrench or a
socket and ratchet, remove the battery hold-down clamp.
5.
Take the battery out of the battery
tray. Batteries are heavy, so grab from the bottom using both hands. If the
battery has a handle, use that instead.
6.
Use either a battery cleaning
solution or the baking soda and water mixture to thoroughly clean any corrosion
that may be left behind on your battery tray and hold down clamp from your old
battery.
7.
Clean the battery cable connectors
with a wire brush. To remove heavy corrosion from the connectors, use
battery-cleaning solution.
8.
Place the new battery in the battery
hold-down tray and secure the battery with the hold-down clamp.
9.
Spray both terminal ends with
anti-corrosion solution.
10.
Attach and tighten the positive
battery cable (Red).
11.
Attach and tighten the negative
battery cable (Black).
12.
Ensure that all cable connections/
hold downs are properly tightened. Check the security of your battery by trying
to move it back and forth. If you can move the battery cable terminals at all,
your car may not start due to a weak electrical connection.
Finding the Oil Dipstick Video One
Reading the Oil Dipstick Video One
The Importance of a Vehicle's Radiator
Maintaining your vehicle's radiator and cooling system is important for keeping
your car in good working condition. A vehicle's engine produce a lot of excess
heat, enough to quickly damage or destroy the engine if it is not properly
cooled by the cooling system. There are a few things you can do yourself to make
sure your vehicle's cooling system is in good working condition:
Checking the Coolant Fluid Video One
Just like going to the dentist for a check-up, you should regularly take your
vehicles in for radiator maintenance. This should be done at least once every
two years, especially if your vehicle is more than five years old. When you take
your vehicle in for a radiator and coolant system check-up, they will do several
tests to make sure it is in proper working condition:
As long as you take care of your vehicle's cooling system by partaking in proper
radiator parts maintenance, your vehicle's radiator will likely last as long as
you own your car.
COOLANT: The cooling system is one
of the most important elements in vehicle operation, yet is not given the
attention that other automotive systems receive. Many people only think about
checking their coolant (also referred to as "antifreeze") when temperatures get
very cold. It is the most obvious and easiest to maintain of all the cooling
system components. Each vehicle is unique (refer to your vehicle owner's manual
for specific guidelines), but typically industry guidelines recommend complete
replacement of the coolant every two years or 24,000 miles. Remember to always
follow your manufacturer's recommendations and keep your coolant fresh.
Under the hood of your vehicle is a
plastic container that contains the fluid for your windshield wipers. Is it full
of liquid? If not, you can fill it with any one of a variety of windshield
washer solutions — you can even use a home window cleaner. Just don’t use
detergent, which can leave a residue that can plug up your lines. Plus, it isn’t
easy to drive with suds all over your windshield!
Pay attention to the kind of windshield
washer fluid you use. Some are concentrated, which means that you need to mix
them with water before adding them to the reservoir. If you live in an area that
gets cold in the winter, consider a premixed washer solution that contains
antifreeze. This
solution comes in quart and gallon sizes and keeps your windshield clean while
preventing the liquid from freezing up in cold weather.
If your wipers have been making a mess of
your windshield, buy new blades or new inserts for them. The rubber wiper
inserts are inexpensive and usually just slide into place. The metal blades into
which the inserts fit are a little more expensive, but if your old ones look
corroded or generally aren’t in good shape, you should replace them as well.
Consult your owner’s manual or auto parts store for the type and size of blades
you need and for instructions on inserting the blades if you can’t figure out
the instructions on the package. Be aware that some vehicles have
different-sized wipers for the driver and passenger sides and that other
vehicles have only one wiper. If your vehicle has a rear window wiper, don’t
forget to check that, too.
Filling Your Washer Fluid Video One
Vehicle Seat Position
An incorrectly positioned seat can not only cause pain to the driver but can
also result in poor car control and premature fatigue.
But proper seat positioning isn’t just about reducing pain, it should also
maximize your visibility and your ability to react quickly to emergency
situations. In addition to avoiding distractions and driving defensively, being
seated comfortably is key to driving well and driving safely.
Follow these three easy steps to adjust your driver’s seat, but remember, always
adjust before you start the vehicle.
1.
Check Your Head Rest
a.
If you’re like me, you probably don’t’ think about adjusting your headrest when
you’re adjusting your seat, but it is an important safety feature on your car in
the event of a crash. The headrest should be positioned so that it will fully
support your head when you lean back.
2.
Pay Attention to Your Arms and Elbows
a.
In your normal driving position, your elbows should always be slightly bent when
you’re holding your steering wheel. This will prevent your arms from becoming
overextended during turns so that they don’t tire as quickly. Slightly bent
elbows also give your airbag enough room to expand in the event of a crash.
3.
Bend Your Knees and Plant Your Heels
a.
When you press on the gas or brake pedal, your knees should always be slightly
bent to prevent an injury in case of an accident. Your right heel should also be
firmly planted on the floor so that you can shift your foot between the gas and
brake pedal without lifting your whole foot.
Vehicle Head Rest Position
A head restraint is designed to limit the movement of the head and provide
support in an accident. A properly adjusted head restraint will help to protect
you against whiplash, and potentially save you from a long-term injury.
Always ensure your head restraint is adjusted properly, as either a driver or a
passenger.
In order to correctly adjust a head restraint you should –
A properly adjusted head restraint will help prevent whiplash by reducing the
distance between the back of the head and head restraint, stopping the neck from
bending back. It will also reduce the amount of time it takes your head to
initially contact the head restraint, and increase the amount of time that your
head is supported during an accident.
Having a locking head restraint is important. A head restraint that cannot be
locked in position may move during an accident. This can compromise the amount
of protection the restraint offers. There is also the danger that rear seat
occupants getting in and out of the vehicle could accidentally move the
restraint out of position.
Blinds Spots
Until you spend time behind the wheel of a car, the concept of "blind spots" can
be hard to understand. And even the most experienced driver can forget to
perform a shoulder-check when changing lanes from time to time. To understand
where your blind spots are, or how big they can be, have a friend help you with
the following exercise.
Adjust your mirrors
First, get behind the wheel of a parked car and
with the ignition off, adjust the steering wheel, seat, seatback and even the
head restraint for yourself as the driver. Next, adjust your driver and
passenger side mirrors, if you haven’t already done so. You should just be able
to see along the side of your car on each mirror with just a glance of your
eyes; you should not have to move your head to do this. To help you adjust this
properly, ask your friend to stand at the rear corner of your vehicle, and
adjust the corresponding (passenger or driver) side so you can just see your
friend in that mirror.
Finally, adjust the rear view mirror so you have
the best view possible of what’s behind you. You’ll find that it may not be
always possible to see someone standing at the corner of your car through the
rear view mirror, but you should be able to see them in your side mirror.
How big is my blind spot?
Now, with your friend starting at the rear corner
of your car, ask them to start moving slowly away from the car in a direction
perpendicular to the way the car is facing. Tell your friend to stop when you
can no longer see them in your side mirror with just a quick glance. Next, ask
your friend to turn in the direction that your parked car is facing, and start
moving forward slowly. While still facing forward as you would if you were
driving, tell your friend to stop as soon as you see her in your peripheral
(side) vision.
The area in which your friend was NOT visible is the size of your blind spot on
that side. Remember, there are at least two blind spots with each car.
Shoulder checking
Blind spots are why it is critical to perform a
shoulder-check before you change lanes. Get the feel of shoulder-checking
while still in a parked car. With your friend standing in your blind spot, and
while keeping both hands on the wheel, perform a quick shoulder check to see if
you see your friend. Remember that you only need to know that the blind spot is
clear and that it is safe to change lanes in that direction; a quick glance over
your shoulder is usually all it takes to keep yourself and others safe. And
remember not to pull the steering wheel in the direction of your shoulder check
– this is something that will come with practice.
It may not be possible to totally eliminate blind spots in your vehicle. You
should always use your vehicle’s turn signal and glance over your shoulder in
advance of changing lanes in order to minimize the risk of failing to see a
vehicle or pedestrian that may be in your vehicle’s blind spot.
Some vehicles may be equipped with backup cameras or sensors that facilitate
identifying objects immediately behind a vehicle and not visible in the rearview
mirror. It is always safest to look behind the vehicle before getting inside and
to not become overly reliant on backup cameras and sensors.
Be courteous – don’t linger in a blind spot
Now that you know how big your blind spot is, think
about other drivers: can they see you if you are in their blind spot? Not
likely. And can you be certain that that driver will perform a shoulder check
correctly if they need to change lanes? So make it a point not to linger in that
area if you think you are in another driver’s blind spot. Take your foot off the
gas pedal and allow the car to slow down so that you are no longer in another
car’s blind spot.
Eliminate Blind Spots Video One
How to Deal With Blind Spots Video One
Proper Mirror Adjustment
Step 1:
Start by setting your rear-view mirror as you normally would.
Then, lean your head all the way to the left so it touches the driver’s window.
From that position, set your left side-view mirror so you can see the back
corner of your car. Now lean the same distance the other way, and set your right
sideview mirror the same way.
Now, here’s what happens. When a car comes up behind you, you should first see
it in your rear-view mirror. But as it passes you (let’s say on your left),
you’ll see it move to the left side of your rear-view mirror. And as its left
headlight disappears from your rear-view mirror, it should instantly show up in
your left side-view mirror. There should be no delay. It should slip from one to
the other, so you can always see it
Step 2:
Left-Side Mirror Alignment: Set your left-side mirror so that as soon as the
passing car's left, front headlight disappears from your rear-view mirror, it
appears in your left-side mirror.
You might need to make some slight adjustments to your side-view mirrors to make
everything line up perfectly. And pulling up next to a line of parked cars (to
simulate another lane of traffic next to you) is a good way to do that.
Step 3:
Right-Side Mirror Alignment: Then do the same thing on the right.
Step 4:
End result? No huge blind spots.
Driving with the mirrors this way takes some getting used to. You have to learn
to rely on your rear-view mirror first. And you’ll have to get used to what your
side-view mirrors are now looking at. But, the good news is that your blind spot
should now be gone!
Correctly Adjusting Your Mirrors Video One
The Office: Dwight's Car Safety Video One
--------- MCMDE Assignment One Ends-----------
MCMDE Quiz 1
-------- MCMDE Assignment Two Begins-----------
Vehicle Starting Tasks
Starting and Stopping Your Car is the Cornerstone of your Driving Skills!
1.
Get in the driver's seat and buckle up. Put
on your seat belt. Do not drive without wearing a seat belt!
2.
Insert the key into the ignition. The ignition point
is often located near the steering wheel. It looks like a round piece of metal,
often with writing on it, with a keyhole in the center of it. Insert the key all
the way into the ignition after you find it.
·
For most vehicles, you will need to take the key
that came with the vehicle. You can usually also use a copy, provided it has
been made properly.
·
Some newer model cars may not have a traditional
key. You will need to find a button to start the car on these vehicles; this is
usually labeled something like "engine start" and placed in a conspicuous
location.
3.
If you're starting an automatic car, put the shift selector in either the "P" or
"N" position. "Automatic" refers
to a car's transmission. It means that you don't have to do the shifting
yourself — the car does it automatically.
·
If the car has an automatic transmission, there
will be only two pedals. In some automatic cars a flat rubber pad is placed on
the far left of the driver's foot area; this is a "dead pedal" meant to be place
to rest your foot and is not a pedal.
·
Automatic transmission cars have a device called a
neutral safety switch that prevents the starter from engaging unless the shift
selector is in the "P" or "N" positions ("Park" or "Neutral"). This prevents the
car from starting in gear.
4.
Twist the ignition key to start the car. You will have to
rotate the key past two stops and push against a spring-loaded third and final
stop to start the car. Use the same hand that you used to insert the key, and
make sure you don't pull the key out while twisting it.
·
Release the key just after twisting to the ignition
point. If you keep the key turned as far as it will go after the engine is
running, you will hear a very ugly grinding sound which comes from the gears in
the starter and the gears in the engine grinding together. This is of course
very bad for the car.
·
The first two notches are labeled 'ACC' for
'accessories' and the second labeled 'ON'. The first position enables usage of
the radio and other electrical accessories; the 'ON' position is the position
that the key springs back to after pressing against the ignition.
5.
If the engine won't start, try these tricks in order. Sometimes,
after turning your key in the ignition, a perfectly working car will fail to
start. Don't worry; it's not the end of the world.
·
If the key will not move past the first or second
notch and the steering wheel will not move, the car has a steering lock engaged.
A steering lock is a safety device designed to help make sure the car doesn't
start unattended. On these cars you may have to 'jiggle' or shake the steering
wheel back and forth a little to allow the keys to turn.
·
If the car will not start, try pressing firmly on
the brake pedal and/or clutch pedal while then turning the key. This is a
feature with some newer cars intended to prevent them from taking off
unpredictably when they are turned on.
·
If the car still will not start, try turning the
key in the other direction. Some older cars may not follow the same conventions
as modern cars.
6.
Look into your mirrors to avoid any people, objects, or cars, and drive
safely.Be sure to follow the rules of the road, and be a defensive
driver.
Starting and Stopping Your Car is the Cornerstone of your Driving Skills!
Starting and Stopping Your
Car Video One
Using Your Vehicle's Lights
Lights are significant because they allow you to see your surroundings, give
others a way to see you, and give other drivers indications of your future
actions. Cars are required to have certain lighting fixtures, and these
generally have luminosity regulations. Make sure that your vehicle has these
fixtures in place and that they are fully functioning.
Vehicles must be equipped with low-beam as well as high-beam headlights.
Low-beams must be turned on when it gets dark or in any moment of low visibility
due to bad weather. Most states (e.g.,Alaska, Michigan, Nevada, Texas, Utah)
require that lights must be turned on from one-half hour after sunset until
one-half hour before sunrise. Other states, (e.g., Arizona, Virginia) require
that lights are turned on from sunset to sunrise. Consult your state's Drivers
Handbook for details.
Some states (e.g., California, Connecticut, Delaware) require by law that if you
turn on your wipers you must also turn on your lights.
High-beams are also located at the front of your vehicle and have a higher
luminosity that covers greater distance. High-beams are to be used in times of
very low visibility. However, you are not to use high-beams in fog, for they
will only reflect the dampened air and blind other drivers.
High-beams are to be turned off when another vehicle is in front of you or
approaching on the opposite side of the road. Most of the states require that
you switch to low-beams 500 ft. or more from oncoming vehicles. Consult your
state's Drivers Handbook for details. The switch for headlights varies between
vehicles. Consult your car's owner manual to make sure you know exactly how to
turn your headlights on.
Each vehicle must also have taillights and brake lights. Most of the states
require that the taillights be visible from 500 ft. Taillights are red and are
located on the back of your vehicle. Brake lights light up when you hit brakes
to signal the drivers behind you to stop.
Parking lights are located at the front and back of your vehicles; they are
white or amber in the front and red on the back. All of them must be visible for
500 ft. It is never legal to drive with your parking lights on; they are only to
be used during parking.
How to Use your Car's Light's Video One
Hazard
warning lights are when all four of a cars indicators flash continuously and
simultaneously whilst activated. Car hazard warning lights are frequently used
inappropriately by many motorists.
Knowing
when to use hazard lights appropriately is important as drivers will typically
slow down when they see hazard lights illuminated. Inappropriate or unnecessary
use of hazard lights can in itself become a potential hazard.
Highway
Code rules states that you MUST
NOT use hazard warning lights while driving or being towed unless you
are on a motorway or unrestricted dual carriageway and you need to warn drivers
behind you of a hazard or obstruction ahead.
Your Vehicle's Dashboard Lights
When
something goes wrong with your car or if a feature you should know about gets
activated, a signal funnels through the electrical system and into the
dashboard. This illuminates a hieroglyphic, and these cover a wide range of
issues—some of which may be serious. Here are the meanings behind 15 of these
curious-looking markers (and what they look like, in case you need a mnemonic
device to help your memory).
Your
dashboard may be different and the symbols may have altered designs or indicate
slightly different things, so be sure to consult your owner’s manual. Some of
these lights could portend a serious malfunction. Don't ignore them. When in
doubt, have a professional check it out.
What it looks like: A pirate ship with its sails down as if
to say, “I’m just a normal boat, no pirates here.”
What it means: Your engine is too hot, friend.
What it looks like: A Buckingham Palace guard telling you the
field goal is GOOD!
What it means: The pressure in one or more of your tires
is too low and needs to be attended to.
What it looks like: You’re about to get three wishes.
What it means: Your engine is running low on oil, or
there is a problem with your car's oil pressure system.
What it looks like: Cthulhu wearing a fedora.
What it means: The car's traction control system is
engaged.
What it looks like: Yellow submarine, a yellow submarine, a
yellow submarine.
What it means: It can blink on for a number of reasons
What it looks like: The cover of a fitness magazine.
What it means: There is an issue with your anti-lock
brake system that needs to be diagnosed and fixed.
What it looks like: The bat signal, if Bruce Wayne had been
traumatized in a shoe closet instead of a bat cave as a child.
What it means: You need to engage the brake, either to
start your car's ignition or to get it out of neutral.
What it looks like: Math lego.
What it means: The car's charging system is short of
power. You are running solely on battery.
What it looks like: A snake-infested ATM.
What it means: You are running low on fuel. Fun fact:
The symbol on the fuel gauge also has an arrow next to it—this indicates which
side of the car has the gas cap. No more gas station three-point turns in rental
cars ever again.
What it looks like: James Carville wearing a bandolier.
What it means: Buckle your seatbelt, please.
What it looks like: A man wearing a tie, shaking his fist at
you as he falls down. Why did you push him?
What it means: There may be an issue with one or more of
your car's airbags, or the airbag system in general.
What it looks like: A jellyfish leaping through a waterfall.
What it means: Your fog lights are on.
What it looks like: They put a boot on your car and your car
is also covered in icicles. This has been the worst winter ever.
What it means: You may need a key with the proper
transponder in order to trigger the ignition. Or, there is something else wrong
with your car's anti-theft system.
What it looks like: Pyramid on the dollar bill...or is that
what the Illuminati wants you to
think it looks like???????????
What it means: There is an issue with your anti-skid
system, and it may be shut off completely.
What it looks like: A conductor's point of view, tapping her
music stand and preparing to lead an orchestra consisting of two candy canes
that are stuck together.
What it means: The washer fluid level is low. Please
fill that up when you get a chance.
Study this: Dashboard Lights Example Site
Turning the Steering Wheel
You
should always have two hands on the steering wheel.
Many of us
have been known to use one hand to steer while using the other to chat on a
cellphone, adjust the radio, or eat a burger. And trust me, your teen has seen
you do this.
So use
proper steering as the first (of potentially many) instances where you confess
to your teen that some of your driving habits aren’t quite up to snuff.
Explain that
you want them to learn proper driving habits because you’re concerned about
their safety and that you’ll try to shore up your bad habits as well. A little
honesty never hurt anybody.
While
driving, your hands should rest comfortably at 10 and 2 on the wheel (or
thereabouts depending on what is comfortable). If you need to make a turn, you
can use one of the following methods. Keep in mind that regular driving requires
using multiple methods, depending on the situation.
As the name
suggests, your hands are going to cross each other while turning the wheel.
Hand Over Hand Steering Method Video One
If making a right turn:
§
Grip the wheel
with your left hand and turn it towards your right hand.
§
At the same time,
your right hand will release from the wheel and cross over your left hand.
Re-grip the wheel with your right hand and continue turning.
The hand-over-hand method turns the wheel a great distance in a relatively short
period of time. Therefore, this method is typically used when making sharp turns
(such as a U-turn) and when driving at slow speeds. When driving slowly, more
steering input is required to turn your vehicle.
While this method is popular, it isn’t as safe as the hand-to-hand method. In
fact, some countries have outlawed hand-over-hand steering. It also exposes you
to additional risk of injury to arms, hands, and face if the airbag deploys.
With the
hand-to-hand (sometimes known as as the pull-push-slide) steering method, your
hands do not cross each other.
Hand to Hand Steering Method Video One
Each hand remains on its respective side of the wheel.
When turning left:
§
Your left hand
begins by pulling in a downward motion from the 10 o’clock position to
the 9 o’clock position.
§
Nearly
simultaneously, your right hand slides down to the 7 o’clock position.
You don’t want to turn the wheel, you’re simply moving your hand from the 2
o’clock position to the 7 o’clock position. By sliding, you’re maintaining
readiness on the wheel.
§
Stop pulling with
your left hand.
§
Use your right
hand to push the wheel “up”. Your hand will move from the 7 o’clock position to
the 2 o’clock position.
§
Return your left
hand to the 10 o’clock position.
Turning right is performed by starting with your right hand.
The hand-to-hand method works well for highway driving where minimal steering
input is required. Many people like this steering method, because both hands are
usually even with each other and they never leave the wheel (as with the
hand-over-hand method).
Fixed hands
We debated even mentioning this steering method because, well, it has pretty
limited use. As the name suggest, your hands stay fixed at 10 and 2. You then
turn your arms about 15-20 degrees (yes, your hands will move, but not relative
to their starting position on the wheel). Obviously, this doesn’t produce much
steering input, so it is typically reserved for high-speed driving. Race car
drivers use this steering method.
Steering “Dont’s”
§
Don’t let the
steering wheel spin freely. Many of us have done this, especially after
completing a turn. However, it’s not a good idea to ever take both hands off
your steering wheel. We think it’s pretty obvious as to why.
§
Don’t put your
hands inside of the steering wheel. Many right-handers do this with their right
hand when making a left turn. They put their hand inside the wheel and grip the
top of the wheel with their palm facing their face. Some people thinks this
gives them more leverage for turning. Power-steering makes turning the wheel so
easy that you should never need to do this.
§
Don’t steer with
one hand…or your knee. Your teen has probably seen you do this, so make sure you
explain to them that it’s dangerous. Despite the fact that you’ve probably
gotten “away” with this steering method without any consequences doesn’t mean
it’s the correct way to steer. Check out our “Do what I say, not what I do”
article.
Proper Steering Wheel Adjustment
Adjust the steering height. Where
adjustable, the steering height should be adjusted to as parallel to back angle,
and to a clear view of the dashboard through the rim. The ideal adjustment
should also allow us to grip the wheel properly (at 9 and 3, see below), with
our palms just lower than our shoulders.
Adjust the steering distance. Where
adjustable, this should be adjusted with the steering wheel height, to as
parallel to the back as possible. While gripping the wheel properly, our elbows
should be bent at about 120 degrees. There should be a minimal clearance of 10"
(and preferably 30cm) between the center of the steering hub and the base of the
breastbone (sternum). It should also not be further away that 45 centimeter
How to Adjust Your Steering Wheel Video One
Proper Hand Placement
Position your hands properly. Your hands should
both be on the wheel, at the 9 and 3 position. This increases the leverage on
the wheel to a maximum. Your palms should be placed against the outer diameter
of the wheel and the thumbs should be lightly hooked on the cross-brace of the
wheel.
·
Grip and stabilize the wheel not only with the
thumbs and/or palms, but mainly with your fingers and fingertips. In general,
keep the grip of the wheel as light as possible without losing your control over
the wheel. This results in better control and less fatigue.
·
Keep both hands on the wheel. Steering with one
hand makes the weight of the hand work on the wheel, for which the shoulder
muscles must be used to keep the wheel steady, resulting in a twist of the
spine, especially if you get into the (bad) habit of holding the wheel from its
top.
Steering Wheel Hand Placement is also highly
suggested as the 10 and 2 position.
Some manufacturers suggest 8 and 4 positioning to
allow for good air bag use.
10 and 2, 9 and 3, and 8 and 4 are all acceptable.
However, 10 and 2 has been said to allow for the best driving technique.
Proper Hand Placement on the Steering Wheel Video
Your Vehicle's Parking Brake
The
parking brake is also called the emergency brake, or hand brake, and is used to
keep the vehicle in place. The parking brake has a cable that directly connects
from the brake mechanism to the lever, or foot pedal, of the vehicle. The
parking brake should be used when the car is left unoccupied for an extended
period of time.
Since
the parking brake is a safety feature, it should be maintained on a regular
basis. Regular checkups and preventative maintenance on your vehicle will help
keep the parking brake from getting stuck when you need it the most. If your
vehicle has sat for a long time, or you use the brake often, it may be a good
idea to have it inspected.
One
thing to always remember is to not drive while the parking brake is on. This can
cause lots of problems within the braking system. Driving with the parking brake
on can wear down the brake pads, the temperature of the engine will rise, and
wear the linings of the main brakes. If you notice a rubber smell while the
brake is depressed, you should bring the car to the mechanic right away.
The
parking brake will need to be adjusted after a certain amount of time, just like
regular brakes do. Over time, the brakes can corrode and not work properly. If
the brake is not working like it is supposed to, it may be time to schedule an
appointment with a certified mechanic to get it cleaned. If needed, the mechanic
will replace any lines or drums that
have corroded over time.
The
parking brake is simple to use. Depending on the make and model of your vehicle,
the parking brake will be a pedal or a hand brake. If it is a pedal, push firmly
down until you feel the brake engage. This means the parking brake is on. To
disengage the parking brake, push the pedal down and it will automatically
release. For a hand brake, push the button in and pull up on the lever. This
means the brake is on. To release the brake, push the button, pull slightly up
on the lever, and lower it to its original position.
The
parking brake is an important safety feature of your vehicle that keeps it in
place while your car is left unoccupied. Keep your brakes maintained by taking
your vehicle to get inspected regularly. Your Mechanic offers brake
system services as well as services
for parking brakes for your
convenience.
When teaching driver education to new
students they have to not only require the skill to use the parking brake but
also understand why they are using it on their vehicle.
From my experience most people who do
use a parking brake are either those who drive standard vehicles or ‘stick
shifts’ or are from Europe where usage is more common and understood; North
Americans seem to have an aversion to using it and pretend their vehicle doesn't
have one fitted.
I have been told more than a few times
by students’ parents that "We don't use that THING!"
Many people think you only need to use
your parking brake when parking on a hill or if your car has a manual
transmission.
This is incorrect; whether your car is
a manual or automatic, the terrain is hilly or flat, you should use your parking
brake every time you park.
How to Apply the Parking Brake Video One
Your Vehicle's Cruise Control
Cruise
control is an invaluable feature on American cars. Without cruise control,
long road trips would
be more tiring, for the driver at least, and those of us suffering from
lead-foot syndrome would probably get a lot more speeding tickets.
Cruise
control is far more common on American cars than European cars, because the
roads in America are generally bigger and straighter, and destinations are
farther apart. With traffic continually
increasing, basic cruise control is becoming less useful, but instead of
becoming obsolete, cruise control systems are adapting to this new reality --
soon, cars will be equipped with adaptive cruise control, which will allow your
car to follow the car in front of it while continually adjusting speed to
maintain a safe distance.
Using
Cruise Control
1.
Start out on a road and
drive until you are past 40 mph (65 kph).
2.
On your steering wheel
or on the levers on the steering wheel, there should be a button or a toggle to
activate cruise control. Hold
your foot steadily on the gas pedal so it does not drop its speed.
3.
On your steering wheel,
while still holding the gas pedal steady, hit cruise on/off and a button that
says Set Coast or just coast. On
a steering wheel that has a lever to activate the cruise control, look at the
arrow on the cruise that says which way to hit it in order to activate the
cruise control.
4.
When you let go of the gas pedal, you may notice that your engine's Revolutions
Per Minute have dropped. This is normal it
just means that your vehicle's cruise control has been activated. A cruise light
in the gauge pod may tell you that you have cruise control on.
Congratulations! You have successfully used cruise control!
5.
To
deactivate cruise control, press on the brake pedal or press the cruise on/off
button again and you will gain control of your vehicle's accelerator.
How to Use Cruise Control Video One
Using Turning Signals and Hand Signals
Before making any turn, whether onto another roadway, a parking lot, another
traffic lane, or leaving a parked position, it is important that you signal.
Your signal lets other drivers, cyclists, and pedestrians know your intentions.
You must give a proper turn signal at least 100 ft (200 ft in some states,
e.g.,Indiana) before turning or changing lanes. Consult your state's Drivers
handbook for details. If your vehicle's turn signals do not work, use hand
signals.
Using the Turn Signals in a Car Video
Hazards Lights Again
Hazard warning lights should be used only when:
·
your vehicle has broken down in a hazardous or
dangerous location that may affect other traffic
·
your vehicle has broken down on the motorway and
has stopped on the hard shoulder
·
you are traveling on a motorway or unrestricted
dual carriageway and you intend on warning following drivers of a hazard or
obstruction ahead
Your Vehicle's Hood Release
Here’s how to open the hood yourself:
1.
Find your hood release and
pop open the hood.
Either consult your owner’s
manual, or try to remember the last time a service station attendant opened the
hood of your car. Did he or she ask you to pull a lever inside the vehicle? Or
did he or she go directly to the front grill?
In newer models, the hood
release is often inside the vehicle, somewhere near the steering column or on
the floor next to the driver’s seat. (It generally displays the word “Hood” or a
picture of a car with its hood up.) In older models, the hood release is behind
the grill or the bumper.
If the hood release is inside
the vehicle, press, push, or pull it until you hear the hood pop open. If the
hood release is at the front, look around and through the grill and feel under
the grill and behind the bumper to find a handle, lever, arm, or button. Then
press, push, or pull it from front to back and side to side until it releases
the hood.
The hood will open a little,
but it will probably be stopped by the safety catch — a metal lever that, when
pressed one way or the other, releases the hood so that it can open all the way.
This gizmo prevents the hood from opening accidentally while you’re driving.
2.
With one hand, raise the
hood as far as it will go.
3.
With the other hand, feel
along the area between the hood and the grill for the safety catch. Release it
and raise the hood the rest of the way.
4.
Secure the hood if
necessary.
If the hood stays up all by
itself, fine. If it doesn’t, look for a hood prop — a long, thin metal rod
attached either to the underside of the hood or to the bottom edge of the hood
opening. Either lower or lift the rod (depending on where it’s located) and fit
the end of it into the slot that’s provided to hold it in place.
How to Open the Hood of Your Car Video
Pulling Away from the Curb
7 Steps:
–
Put foot on brake
–
Select proper gear
–
Perform traffic checks
–
Apply proper signal
–
Release parking brake
–
Select gap in traffic flow
–
Move to lane
Pulling Away From the Curb Video
Parking Next to a Curb
When Parking Next to a Curb You want to be 6 to 12 inches from the curb!
When parking at the curb, come in
slow and give yourself plenty of room so you don't have to turn you wheels
sharp.
Turning too sharp or coming
in at much more than 5 mph risks bumping and scraping and damaging you tire and
cars alignment.
Also when curb parking avoid
parking by mail boxes, trees, poles or other objects close to the edge of the
curb that would cause your mirror to scrape them and make it difficult to open
the curbside door.
Parking in front of a Curb
Parking in front of a Curb Website
How to Start and Stop the Vehicle Smoothly Video
When Signaling Before a Turn
Your lights and turn signals are your primary
means of communicating with other drivers. Many drivers signal just prior to
(and sometimes during) a turn. Is this right or wrong? When should a person
signal?
The basic rule for using turn signals is to
SIGNAL EARLY. Most states require drivers to signal at least 100 feet before
making a turn. If you are traveling over 40 mph, signal at least 200 feet before
the turn. Parents, since it is difficult to judge exactly how far 100 or 200
feet is, teach your teen this simple rule: signal early enough to allow the
person behind you adequate time to recognize your turn signal BEFORE he sees
your brake lights. In other words, the driver behind you needs to know you
intend to slow down. Signaling three to five seconds before you take an action
gives him time to recognize that you are going to put on brakes.
Can you signal too early? As a matter of fact,
you can. Pay attention to the roadway and the available exits. If you signal too
early, you may give the impression that you are going to turn on an earlier exit
than you intend. If your turn closely follows another street, driveway, or
parking lot entrance, you may want to wait until you are just upon or past the
first turn before signaling your turn. You want to avoid communicating that you
are turning at the earlier opportunity if you are not actually doing so.
The signal early principle applies to changing
lanes as well. Parents, remind your student that as he drives other drivers are
trying to predict what he is going to do, just as he is trying to predict what
they are going to do. Early signaling helps eliminate confusion and gives the
student driver adequate time to respond. Make sure your teen remembers to cancel
the signal after completing a turn or lane change. Giving a false signal can be
as much a problem for other motorists as not signaling at all.
Rearview Mirror Adjustment
Adjusting Your Rearview Mirror Video
Steering Methods Review
Hand Over Hand Steering Method Review Video
Hand to Hand Steering Method Review Video
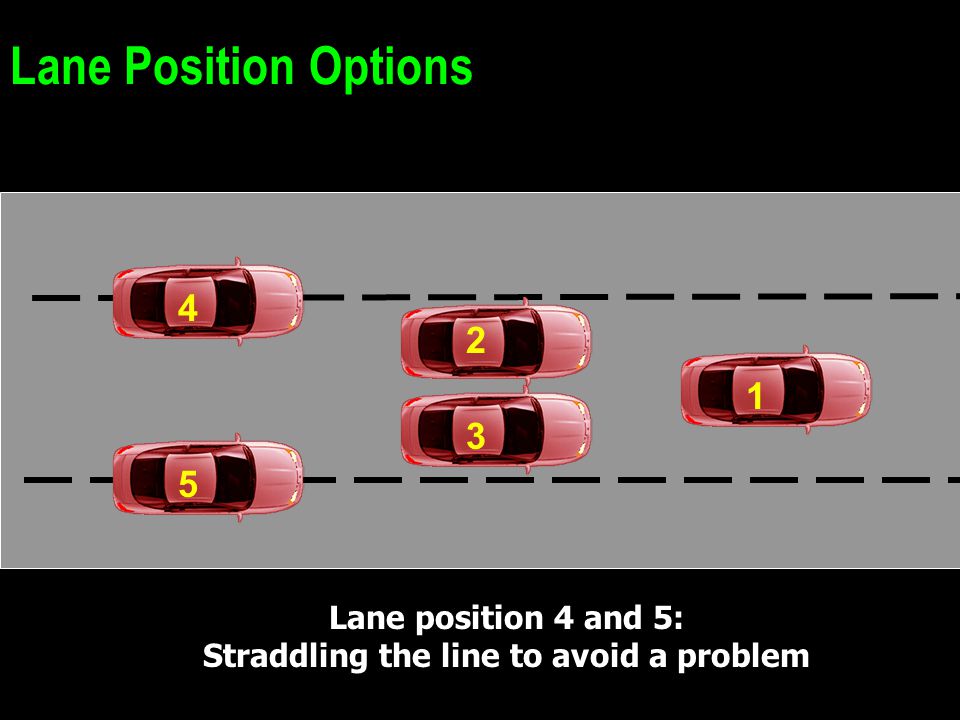
Lane Position While Driving
Lane position is the placement of your car in the center, on the right, or on
the left of a lane. Use these different lane positions to make adjustments for
potential problems and create more space between your car and problem
situations. On most highways or streets the width of a lane is twelve feet. The
average vehicle has a width of six feet, which gives you six feet to maneuver
your vehicle within the lane.
Lane Positions: Getting on the Same Page
If you're like me, you spent most of your life not knowing anything about lane
positions. Then I became a driving instructor. Now you're teaching your teen. So
it's time to put a name to something you don't even realize you already
know....There's actually a name for your car's position on the roadway. The
names aren't very original. But that's okay. They're easy to remember.
1.
Driving in the
center of your lane is technically referred to as driving in lane position one
(Lane Position 1).
2.
Hugging the left
side of the lane is Lane Position 2.
3.
Hugging the
right edge of the lane is Lane Position 3.
Drivers alter their lane positions for many reasons.
If you are driving in the center of your lane in normal conditions, the position
and speed of your car tells other roadway users that they can trust you. If you
pass a parked car or bicycle and move to LP2 and reduce speed, you show that you
are considerate. When you see that oncoming traffic includes a mobile home on a
large truck and you move to LP3, you indicate comprehension that bigger vehicles
will squash you if there was a collision.
Bottom line, you will intuitively trust or be wary of other drivers depending on
the cues their driving habits send you.
Anticipate Other Drivers Actions
How do you know a car is really going to stop at an intersection? Or turn? Or
make a lane change? Look at the following factors to help you know how to adjust
your own driving:
1.
Vehicle speed (too fast, too slow, just right)
2.
Direction of the tires (straight or turning)
3.
Lane position (LP1, LP2, LP3)
4.
Signal lights (turning, braking, backing)
5.
The eyes have it (Do other drivers see you? The pedestrians? The
bicycles? The road construction?)
Practice answering these questions about other drivers for the next week. Does
their behavior show they know what they're doing? Or are they putting out mixed
signals? Knowing the answers will build years to your experience level in just a
few short days.
So, just what does your lane position say about you?
Whether or not I should trust you, of course.
Lane Position Website or Picture to Help Explain Positions 4 and 5
Keep Your Vehicle Centered Video
ESC and Path (Line of Travel) Video
Aiming While Driving Video One
Stopping At Stop Signs
Just because there’s a stop sign, it doesn’t mean the other car is
going to stop. Don’t enter the intersection unless it is clear and that any
approaching cars are far enough away that they won’t hit you if they don’t stop.
Otherwise, wait for those cars to come to a stop before completely crossing the
intersection. Unfortunately, you can’t assume other drivers will follow the
rules of the road.
Just because you have the right of way, it doesn’t mean other cars
are going to give it to you. You must look in all directions several times
before proceeding into the intersection. You have to be certain that another car
isn’t also crossing.
Always look for pedestrians and other objects approaching the
intersection.
Look for potential dangers such as construction equipment, kids
playing near the roadway, and other hazards.
Your Vehicle's Dashboard Lights
-------- MCMDE Assignment Two Ends-----------
MCMDE Quiz 2
Pre-Drive In-Car Instruction: Lesson 2